Fix: Wi-Fi doesn't have valid IP configuration on Windows 10.
Wi-Fi network is a great choice if you don't want to deal with wireless and if you want to move your laptop to a different location. Although Wi-Fi is quite useful, some Windows 10 users reported Wi-Fi doesn't have valid IP configuration error message. This error message will prevent you from using Wi-Fi, so let's see how to fix it.
For PC problems, we recommend ReimagePlus.
This tool will repair most computer errors, protect you from file loss, malware, hardware failure and optimize your PC for maximum performance. Quickly fix PC issues and prevent others from happening with this software:
- Download ReimagePlus (100% safe download and endorsed by us).
- Click "Start Scan" to find Windows issues that could be causing PC problems.
- Click "Repair All" to fix all issues.
Solution 1 – Reset TCP/IP
One of the simplest ways to fix this issue is to use netsh command. To do that, follow these steps:
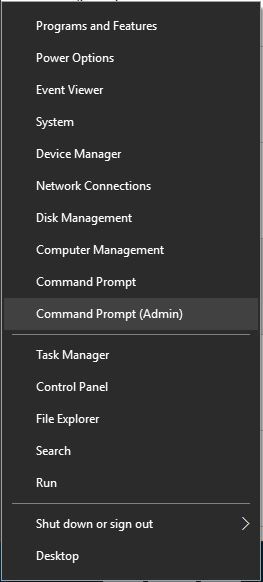
- Start Command Prompt as administrator. To do that press Windows Key + X and choose Command Prompt (Admin) from the menu.
- When Command Prompt opens, enter the following lines:
- Close Command Prompt and restart your PC.
Users reported that this solution usually fixes issues with IP configuration problem, but bear in mind that if you use static IP address you'll have to set it again. If the previous commands didn't work, you might want to try these commands as well:
- ipconfig /release
- ipconfig /flushdns
- ipconfig /renew
Solution 2 – Change wireless SSID and password
It was reported that you can fix Wi-Fi doesn't have valid IP configuration error by accessing your modem and changing the wireless SSID and password. To do that, you'll have to connect your PC with your modem using Ethernet cable, access your modem and change wireless SSID and password. For more details on how to do that, we strongly suggest that you check your modem's manual.
Solution 3 – Set the channel width to Auto
One suggested solution is to set the channel width to Auto. To do that, follow these steps:
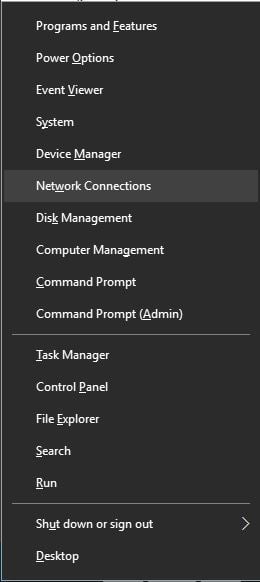
- Press Windows Key + X and select Network Connections from the menu.
- When Network Connections window opens, right click your wireless connection and choose Properties from the menu.Click the Configure button and go to the Advanced tab.
- Locate 802.11n Channel Width for band 2.4 and set it to Auto.
- Click OK to save changes.
Solution 4 – Set your IP address manually
When you connect to wireless network you're usually given an IP address. This process is done by DHCP, but if there's an issue with DHCP or with its configuration, you'll get an IP configuration error. One workaround that is suggested by users is to assign an IP address for your device manually. To do that, follow these steps:
- Press Windows Key + X and choose Network Connections.
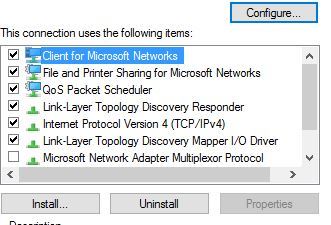
- Right click your wireless network and choose Properties from the menu.
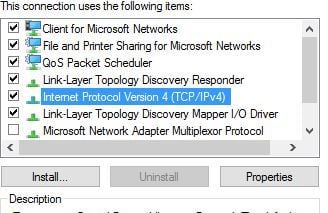
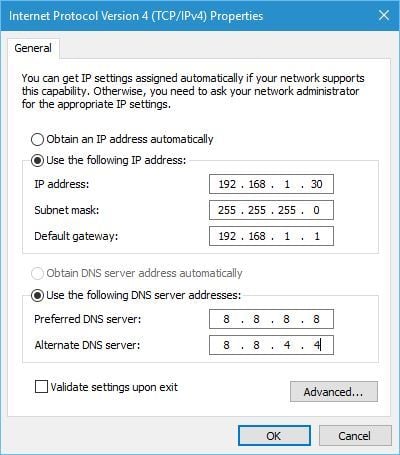
- Select Internet Protocol Version 4 (TCP/IPv4) and click the Properties button.
- When Properties window opens, select the Use the following IP address option and enter the IP address, Subnet mask and Default gateway. We used settings that work for our configuration, but you might have to enter different data. In addition, you'll have to enter the DNS server manually. In our example we used Google's Public DNS, but you can also use 192.168.1.1 as your Preferred DNS server.
- After you're done, click the OK button.
Alternatively, you can access your router and turn off DHCP and configure it to assign a static IP address to your PC.
Solution 5 – Change the number of DHCP users
According to some users, you can fix this problem by increasing the number of DHCP users. Some routers are usually limited to 50 DHCP users, and this can cause Wi-Fi doesn't have valid IP configuration error to appear. To fix this issue you need to access your router and increase the number of DHCP users manually. Users reported that after increasing the number of DHCP users all issues were resolved. To see how to increase the number of DHCP users on your router, be sure to check its manual.
In addition, some users also suggest that you can fix the problem with IP configuration by increasing the number of maximum wireless users. Some routers are limited to only 10 wireless users, and by increasing the maximum number of users the issue was resolved.
Solution 6 – Perform a Clean boot
Some users claim that you can fix this problem by performing a Clean boot. By using Clean boot you'll disable all third-party applications and services that might be interfering with your wireless connection. To perform Clean boot do the following:
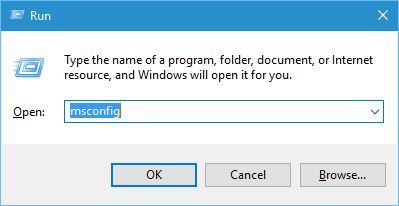
- Press Windows Key + R on your keyboard and enter msconfig. Press Enter or click OK.
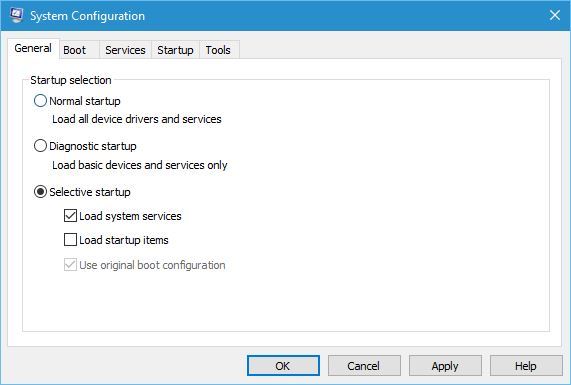
- When Windows Configuration window opens, select Selective startup and uncheck Load startup items.
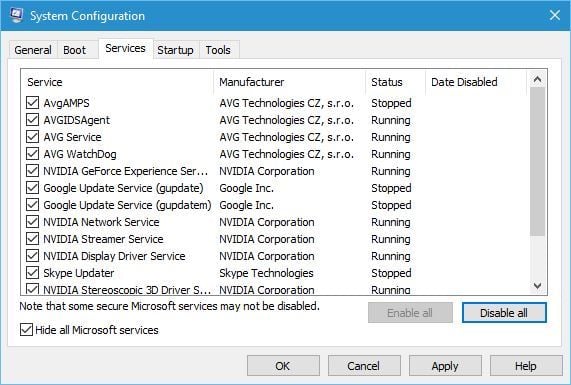
- Go to Services tab, check Hide all Microsoft services and click Disable all button.
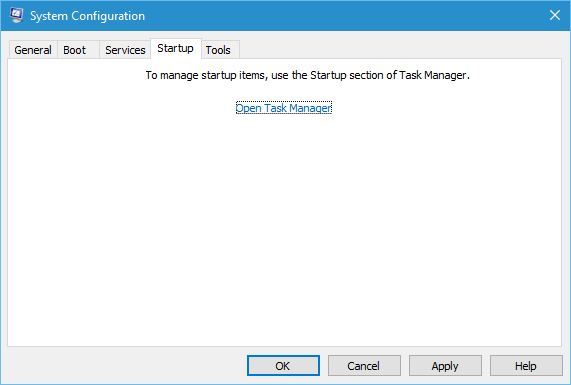
- Go to Startup tab, and click Open Task Manager.
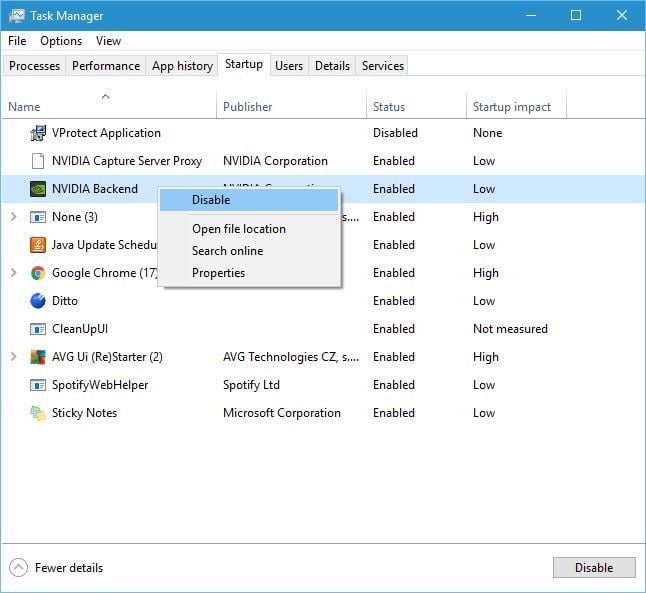
- When Task Manager opens you'll see a list of startup applications. Right click each item on the list and choose Disable.
- After you disable all startup applications close Task Manager and click Apply and OK in Windows Configuration window.
- Restart your computer.
After restarting your computer check if the issue is resolved. If the problem doesn't appear, you might want to enable the disabled services and applications and find the one that is causing this issue so you can remove it or update it.
Solution 7 – Remove your antivirus software
Antivirus software or firewall can often interfere with your Internet connection, and if you're getting Wi-Fi doesn't have valid IP configuration error, you might want to temporarily remove your antivirus or firewall. Users reported that Avast and AVG antivirus can cause this issue, and after removing the problematic software the issue was resolved. Bear in mind that almost any antivirus software can can this problem, so be sure to temporarily remove all third-party antivirus tools. If removing the antivirus software fixes the problem, you can proceed and install the latest version of your antivirus or switch to a different antivirus software.
Solution 8 – Make sure that DHCP is turned on
As we previously mentioned, DHCP is in charge of assigning the IP addresses to devices that connect to your network, and if DHCP isn't running you might encounter certain problems. To make sure that DHCP is enabled, you can always troubleshoot your network connection by doing the following:
- Open Network Connections.
- Locate your network adapter, right click it and choose Diagnose.
- Wait for the scan to finish.
You can also set your IP address to be obtained automatically in order to turn on DHCP. This process is similar to the one described in Solution 4, so make sure you check that solution. Lastly, you can always turn on DHCP from your router settings in case you turned it off earlier.
Solution 9 – Uninstall your wireless adapter driver
Users claim that they managed to fix this problem by uninstalling their wireless adapter driver. To do that, follow these steps:
- Press Windows Key + X and choose Device Manager.
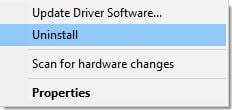
- When Device Manager opens, locate your wireless device, right click it and choose Uninstall.
- If available, check Delete driver software for this device and click OK.
- After the driver is removed, restart your PC.
When your PC starts again, Windows 10 will automatically install the default wireless driver. If the default driver works well, you can continue using it, but if there are any problems you might have to download the latest driver and install it.
Solution 10 – Make sure that the security type matches
Sometimes problems with IP configuration can be caused by your security type, so make sure that the security type on your PC matches the security type set by your router. To do that, simply open your router settings page, visit the wireless section and check what type of security is being used. After that, make sure that your wireless adapter is using the same security type.
Problems with Wi-Fi IP configuration can prevent you from accessing the Internet, but we hope that you managed to fix this problem after using one of our solutions.
For updating all your drivers, we recommend this software.
Downloading drivers manually can be a long and tedious process. Outdated drivers can often cause crashes, file loss and even permanent damage to your computer. DriverAgent Plus quickly and automatically downloads all the drivers that you need:
- Download DriverAgent Plus (100% safe download and endorsed by us).
- Once the download is complete start the DriverAgent Plus.
- Click the Start Scan button and let DriverAgent Plus download all the necessary drivers.
READ ALSO:
Source: www.bing.com
Images cred ited to www.bing.com and
